Downloading and Building Kii Balance
You can download the source code of Kii Balance from GitHub. As for the Android version, you can also download and install a built APK file.
You can use the application whose AppID is ee573743 only for walking through this tutorial. When you develop a new mobile app, ensure to create a new application on the developer portal. Data entered for the Kii Balance tutorial might be deleted without notice.
Building the Android app
Download and build the source code on your development machine by following the steps below. Android Studio 2.2 or later is required.
Create an application.
Create an application on Kii Cloud.
Complete the steps in Creating a Kii Application and then return to this topic.
The linked topic contains a step to check the AppID when you create an application. Record them for future reference.
Download the source code.
In order to download the source code from GitHub, move to the directory where you want to create an Android project and run the following command:
$ git clone https://github.com/KiiPlatform/KiiBalance-AndroidStart Android Studio.
Start Android Studio and open the
KiiBalance-Androiddirectory as a project.If you see a message saying that it is recommended to update the Android plugin for Gradle, follow the on-screen instruction to update the plugin.
Embed the AppID.
Open and edit the
app/src/main/java/com/kii/sample/balance/kiiobject/Constants.javafile in Android Studio.Replace the values of
APP_IDwith the AppID created in Step 1. You can set an arbitrary value inAPP_KEY.public static final String APP_ID = "ee573743"; public static final String APP_KEY = "5eb7b8bc1b4e4c98e659431c69cef8d4"; public static final Kii.Site APP_SITE = Kii.Site.JP;Build and run the mobile app.
You can build and run the mobile app in Android Studio without further modifications because the basic settings of the project are pre-configured.
Gradle automatically downloads and includes the Kii Cloud SDK and other associated libraries when you build the mobile app in Android Studio.
Downloading the Android APK file
You can directly install the built APK file if you just want to see how Kii Balance works on Android. Skip this section if you build the mobile app by following the steps described in the previous section.
Install the mobile app on an Android smartphone by following the steps below.
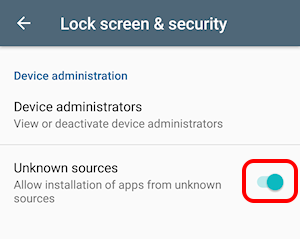
Change the Android setting.
Installation from unknown sources is prohibited by default. Allow installation of apps from unknown sources in the Settings app. Kii recommends turning off the setting after you install Kii Balance.
See the setting screen below. It might appear differently depending on the version of Android.
Download the APK file.
Download the built APK file with the URL below to the Android smartphone.
https://docs.kii.com/references/samples/KiiBalance-1.1.apk

Install the APK file.
Open the downloaded APK file to install Kii Balance to the smartphone.
Kii Balance that is installed with the built APK file uses the Kii Cloud application that is identified with the values below:
APP_ID = "ee573743"
APP_KEY = "5eb7b8bc1b4e4c98e659431c69cef8d4"
APP_SITE = JP
This application is shared by all the developers who take the Kii Balance tutorial. Therefore, you cannot use usernames that have been registered by other developers nor access the application on the developer portal.
Building the iOS app
Download and build the source code on your development machine by following the steps below. Xcode 8 or later and CocoaPods are required.
The source code of Kii Balance for iOS is available in Objective-C and Swift 3. The difference is only the language; the APIs and the programming logic are implemented in the same way.
Create an application.
Create an application on Kii Cloud.
Complete the steps in Creating a Kii Application and then return to this topic.
The linked topic contains a step to check the AppID when you create an application. Record them for future reference.
Download the source code.
In order to download the source code from GitHub, move to the destination directory and run the following command:
$ git clone https://github.com/KiiPlatform/KiiBalance-IOSThe
KiiBalance-iOSdirectory in the download has theSwiftandObjectiveCdirectories. Each of them is an Xcode workspace.Move to the directory of your language.
$ cd Swift$ cd ObjectiveCDownload libraries.
Download the Kii Cloud SDK and associated libraries by using CocoaPods.
$ pod installStart Xcode.
Start Xcode and open the
SwiftorObjectiveCdirectory as a workspace.Choose "File" > "Open", and select the
SwiftorObjectiveCdirectory and click the "Open" button.Embed the AppID.
Open and edit the
KiiBalance/AppDelegate.swiftorKiiBalance/AppDelegate.mfile in Xcode.Replace the values of
APP_IDwith the AppID created in Step 1. You can set an arbitrary value inAPP_KEY.-
let APP_ID = "ee573743" let APP_KEY = "5eb7b8bc1b4e4c98e659431c69cef8d4" let APP_SITE = KiiSite.JP -
NSString* const APP_ID = @"ee573743";
NSString* const APP_KEY = @"5eb7b8bc1b4e4c98e659431c69cef8d4";
KiiSite const APP_SITE = kiiSiteJP;
-
Build and run the mobile app.
You can build and run the mobile app without further modifications because the basic settings of the project are pre-configured.
Check the settings such as signatures if you test the mobile app on a real device.
What's Next?
Let us start and play with Kii Balance.
Go to Running Kii Balance.