データ一覧画面の実装
実装の解説の最後に、データ一覧画面の実装を説明します。MainViewController.swift ファイルおよび MainViewController.m ファイルに実装されています。
データ一覧画面は、ストーリーボードでログイン画面からの遷移先として設定されています。
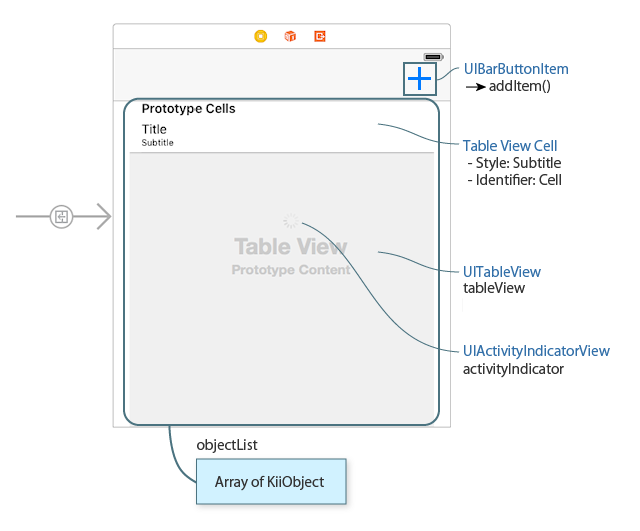
画面の各要素は、ストーリーボードを介してクラス内の実装と次のように結びついています。
アウトレットによって、一覧対象のデータを
UITableViewクラスの変数であるtableViewプロパティに関連付けます。一覧対象のデータは、KiiObject の配列
objectListをクラス内で保持することによって管理します。Swift での型は[KiiObject]、Objective-C での型はNSMutableArrayです。tableViewプロパティのデータ項目(Table View Cell)をSubtitle形式に設定して、タイトルとサブタイトルの構成で表示するものとします。また、識別子としてCellを設定します。viewDidLayoutSubviews()メソッド内で、画面上部のナビゲーション部分に "+" ボタンを作成します。このボタンがタップされたとき、addItem()メソッドが呼び出されるように設定します。アウトレットによって Activity Indicator を
activityIndicatorに関連付けて、待機中のアニメーションを制御できるようにしています(以下、Activity Indicator の説明は省略しています)。
データ構造
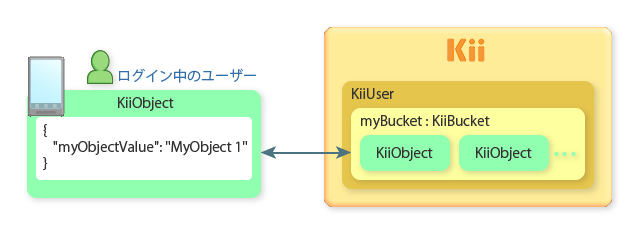
この画面では、JSON 形式のキーと値のペアを保持する KiiObject を作成し、それを Kii Cloud とやりとりします。データはログイン中のユーザーのスコープの Bucket myBucket に格納されます。
ここでは、KiiObject に格納するデータの作成、一覧取得(表示)、削除の各処理を実装します。
格納するデータ
Kii Cloud では任意の値や型を持ったデータを JSON 形式のキーと値のペアとして扱うことができます。
Hello Kii で扱うデータのキー名はプログラムで myObjectValue と指定されるため、上の図のような JSON 文字列として処理されます。
実際の開発時には、キー名も値の型もモバイルアプリの仕様に合わせて自由に決めることができます(ネストした JSON データも扱えます)。
値の型をスキーマなどの形で事前に指定する必要はありません。プログラムから KiiObject を作成するだけで、データの格納と取得を実行できます。また、JSON データの 1 階層目に格納された値からは自動的にインデックスが作成されるため、高速な検索を行うことができます。
データの作成
まずはデータの作成処理を説明します。
ナビゲーションの "+" ボタンがタップされると、addItem() メソッドが呼び出されます。このメソッドのコードを抜粋すると、以下のようになります。
-
objectCount += 1 let value = String(format: "MyObject %d", objectCount) let bucket = KiiUser.current()!.bucket(withName: bucketName) // Create a new KiiObject instance and set the key-value pair. let object = bucket.createObject() object.setObject(value, forKey: objectKey) // Save the object asynchronously. object.save { (object, error) -> Void in if error != nil { self.showMessage("Save failed", error: error as NSError?) return } // Insert the object at the beginning of the object array and refresh the list. self.objectList.insert(object, at: 0) self.tableView.reloadData() } -
NSString *value = [NSString stringWithFormat:@"MyObject %d", ++_objectCount];

KiiBucket *bucket = [[KiiUser currentUser] bucketWithName:BUCKET_NAME];

// Create a new KiiObject instance and set the key-value pair.
KiiObject *object = [bucket createObject];
[object setObject:value forKey:OBJECT_KEY];

// Save the object asynchronously.
[object saveWithBlock:^(KiiObject *object, NSError *error) {
  if (error != nil) {
    [self showMessage:@"Save failed" error:error];
    return;
  }

  // Insert the object at the beginning of the object array and refresh the list.
  [self.objectList insertObject:object atIndex:0];
  [self.tableView reloadData];
}];
上のサンプルコードに示す objectCount、bucketName、objectKey は以下のように宣言されています。
-
fileprivate var objectCount = 0 fileprivate let bucketName = "myBucket" fileprivate let objectKey = "myObjectValue" -
@property int objectCount;
NSString * const BUCKET_NAME = @"myBucket";
NSString * const OBJECT_KEY = @"myObjectValue";
ここでは、次の処理を順に行います。
格納するデータの作成
KiiObject へ格納するデータ値を
valueに作成します。ここでは、連番を振り出して、MyObject 1のような適当な文字列を作成しています。Bucket の準備
ログイン中のユーザーのスコープの Bucket を準備します。
前のページに示したように、
current()メソッドによってログイン中のユーザーのKiiUserインスタンスを取得できます。このインスタンスに対してbucket(withName:)メソッドを実行すると、このユーザーのスコープの Bucket を取得できます。取得したい Bucket 名を保持する変数bucketNameを引数に指定します。Bucket が存在しない場合は、データ作成のタイミングで新規に作成されます。既存の Bucket がある場合はその Bucket が取得されます。
Swift のサンプルコードでは、
KiiUser.current()!のように強制アンラッピングによってKiiUserインスタンスを取得しています。これは、実行する時点でユーザーがログイン状態になっていることを想定した処理です。ログインしているかどうか分からない場合、nil になる可能性を考慮して、if文で分岐するか、オプショナルチェーンKiiUser.current()?を利用する必要があります。KiiObject の準備
createObject()メソッドによって Bucket 内に KiiObject を作成します。setObject(_:forKey:)メソッドによって KiiObject の JSON データの第 1 階層にキーと値のペアを設定します。以下のような JSON データが作成されます。{ "myObjectValue" : "MyObject 1" }KiiObject の保存
save(_:)メソッドによって KiiObject を保存します。手順 3 までの処理はデバイス上で実行されていましたが、ここで Kii Cloud と通信して Kii Cloud 上に KiiObject を保存します。通信を行うため、ここでもノンブロッキング API を使用しています。保存処理が完了すると、クロージャーが呼び出されます。エラーがない場合は、登録した KiiObject を
objectListの先頭に追加します。さらに、tableViewのreloadData()メソッドを呼び出して画面に反映します。エラーの場合はエラーメッセージを表示します。save(_:)メソッドによって Kii Cloud 上のデータを更新すると同時に、objectListの追加操作によってデバイス側のデータも更新している点にご注意ください。
データの一覧処理
データの一覧処理は、データ一覧画面の初回表示のタイミングで実行されます。iOS から viewDidAppear(_:) メソッドが呼び出されると、Kii Cloud からデータを取得し、tableView を使って画面にデータを表示します。
データの取得
一覧取得は、Bucket 内データの全件取得のクエリーを実行することで実現します。以下に処理を抜粋します。
-
override func viewDidAppear(_ animated: Bool) {
  // Clear all items.
  self.objectList.removeAll()

  // Create an empty KiiQuery. This query will retrieve all results sorted by the creation date.
  let allQuery = KiiQuery(clause: nil)
  allQuery.sort(byDesc: "_created")

  // Define the bucket to query.
  let bucket = KiiUser.current()!.bucket(withName: bucketName)

  // Perform the query.
  bucket.execute(allQuery) { (query, bucket, result, nextQuery, error) -> Void in
    ...
  }
}
-
- (void)viewDidAppear:(BOOL)animated {
  // Clear all items.
  [self.objectList removeAllObjects];

  // Create an empty KiiQuery. This query will retrieve all results sorted by the creation date.
  KiiQuery *allQuery = [KiiQuery queryWithClause:nil];
  [allQuery sortByDesc:@"_created"];

  // Define the bucket to query.
  KiiBucket *bucket = [[KiiUser currentUser] bucketWithName:BUCKET_NAME];

  // Perform the query.
  [bucket executeQuery:allQuery withBlock:^(KiiQuery *query, KiiBucket *bucket, NSArray *result, KiiQuery *nextQuery, NSError *error) {
    ...
  }];
}
ここでは、次の処理を行っています。
リストのクリア
念のため
objectListに格納されている KiiObject を全件クリアしておきます。クエリーの準備
全件取得のクエリーを準備します。
まず、
KiiQuery(clause:)メソッドによってクエリーオブジェクトのallQueryを作成します。ここでは、全件取得を意味する空のクエリー(nil)としています。さらに、取得時のソート条件を
sort(byDesc:)メソッドで指定しています。これは、KiiObject の作成日時(_createdフィールド)の降順でのソートを意味します。すでに見たように、データの作成時には新しい KiiObject を先頭に追加しているため、降順でのソートが適切です。検索 API では、文字列や数値の比較によるクエリーや、And や Or などの検索条件の組み合わせもサポートしています。SQL ではなく、オブジェクトの構造によって条件式を表現します。
Bucket の用意
次に、検索対象の Bucket を用意します。データ作成時と同様に、取得したい Bucket 名(ログイン中のユーザーのスコープの
myBucket)を保持する変数bucketNameを引数に指定します。クエリーの実行
allQueryを、bucketのexecute(_:_:)メソッドに渡して、クエリーを実行します。今まで見てきた処理と同様に、クエリーの実行も Kii Cloud へのアクセスが必要なため、ノンブロッキング API で実行します。コールバックの詳細は次のセクションで説明します。
取得したデータの処理
クエリーを実行し、Bucket 内のデータを全件取得できた場合、クロージャー内の処理でそれを画面に表示します。
-
bucket.execute(allQuery) { (query, bucket, result, nextQuery, error) -> Void in if error != nil { self.showMessage("Query failed", error: error as NSError?) return } // Add the objects to the object array and refresh the list. self.objectList.append(contentsOf: result as! [KiiObject]) self.tableView.reloadData() } -
[bucket executeQuery:allQuery withBlock:^(KiiQuery *query, KiiBucket *bucket, NSArray *result, KiiQuery *nextQuery, NSError *error) {
  if (error != nil) {
    [self showMessage:@"Query failed" error:error];
    return;
  }

  // Add the objects to the object array and refresh the list.
  [self.objectList addObjectsFromArray:result];
  [self.tableView reloadData];
}];
取得に成功した場合(error が nil の場合)、次の処理を行います。
クロージャーの引数
resultとして、クエリーの実行結果が渡されます。result内には、取得できた KiiObject の一覧が配列として格納されています。これをobjectListの末尾にまとめて追加します。tableViewのreloadData()メソッドによって、取得したデータを画面に反映させます。
この実装は、取得件数が多くなると正しく動作しません。件数が多い場合、executeQuery(_:_:) メソッドは ページネーション の機能によって、結果を複数のページに分割して返します。Hello Kii では実装の複雑化の防止のため、初めの 1 ページだけを処理しています。
UITableView の制御
iOS の UITableView クラスでは、UITableViewDataSource プロトコルのメソッドによってデータ一覧の表示内容を決めます。
初めに、一覧内のセクション数を返すメソッドとデータの件数を返すメソッドを以下のように定義します。一覧内に複数のセクションを配置せず(セクション数は 1 つとし)、項目数は objectList に含まれる項目の数とします。
-
func numberOfSections(in tableView: UITableView) -> Int {
  // Return the number of sections.
  return 1
}

func tableView(_ tableView: UITableView, numberOfRowsInSection section: Int) -> Int {
  // Return the number of rows in the section.
  return objectList.count
}
-
- (NSInteger)numberOfSectionsInTableView:(UITableView *)tableView {
  // Return the number of sections.
  return 1;
}

- (NSInteger)tableView:(UITableView *)tableView numberOfRowsInSection:(NSInteger)section {
  // Return the number of rows in the section.
  return _objectList.count;
}
次に、Table View Cell を作成します。一覧中の項目は、UITableViewDataSource プロトコルの tableView(_:cellForRowAt:) メソッドによって作成します。
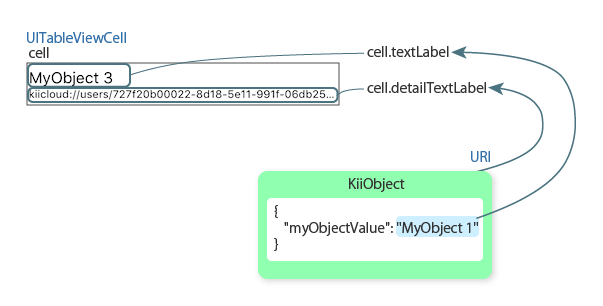
ここでは、次の図のように値を設定してデータを表示します。
tableView(_:cellForRowAt:) メソッドの処理を以下に示します。
-
func tableView(_ tableView: UITableView, cellForRowAt indexPath: IndexPath) -> UITableViewCell {
  // Initialize a cell.
  var cell: UITableViewCell? = tableView.dequeueReusableCell(withIdentifier:"Cell", for:indexPath)
  if cell == nil {
    cell = UITableViewCell(style:UITableViewCellStyle.default, reuseIdentifier:"Cell")
  }

  // Fill the cell with data from the object array.
  let obj = objectList[indexPath.row]
  cell!.textLabel!.text! = obj.getForKey(objectKey) as! String
  cell!.detailTextLabel!.text! = obj.objectURI!
  return cell!
}
-
- (UITableViewCell *)tableView:(UITableView *)tableView cellForRowAtIndexPath:(NSIndexPath *)indexPath {
  // Initialize a cell.
  UITableViewCell *cell = [tableView dequeueReusableCellWithIdentifier:@"Cell" forIndexPath:indexPath];
  if (cell == nil) {
    cell = [[UITableViewCell alloc] initWithStyle:UITableViewCellStyleDefault reuseIdentifier:@"Cell"];
  }

  // Fill the cell with data from the object array.
  KiiObject *obj = _objectList[indexPath.row];
  cell.textLabel.text = [obj getObjectForKey:OBJECT_KEY];
  cell.detailTextLabel.text = obj.objectURI;
  return cell;
}
図に示したように、KiiObject のデータを UITableViewCell インスタンスに設定します。
まず、iOS の標準的な方法に従って、一覧に表示する UITableViewCell インスタンスの変数 cell を作成します。
このメソッドでは、引数 indexPath の row プロパティによって処理中の要素のインデックス番号(0, 1, 2, …)が渡されます。このインデックスに対応する KiiObject を取得して obj に保持します。
次に、obj から値を取り出して cell に設定します。ストーリーボードで cell の表示形式を Subtitle に設定しているため、textLabel プロパティと detailTextLabel プロパティに値を設定します。
textLabelタイトルとして、
objectKey(KiiObject のmyObjectValueフィールド)の値を設定します。KiiObject のgetForKey(_:)メソッドによって、MyObject 1のような値を文字列で取得できます。detailTextLabelサブタイトルとして、
objectURI(KiiObject の URI)の値を設定します。URI は Kii Cloud SDK において、アプリケーション内の KiiObject を一意に表現する文字列です。REST API では URI による表現を使用できません。
データの削除
一覧内で項目をタップすると、その項目を削除できます。項目の削除時には、確認メッセージを表示し、削除を実行する場合は次の performDelete(_:) メソッドが実行されます。引数 position には、削除対象の項目のインデックス番号(0, 1, 2, …)が渡されます。
-
func performDelete(_ position: Int) {
  // Get the object to delete with the index number of the tapped row.
  let obj = objectList[position]

  // Delete the object asynchronously.
  obj.delete { (object, error) -> Void in
    if error != nil {
      self.showMessage("Delete failed", error: error as NSError?)
      return
    }

    // Remove the object from the object array and refresh the list.
    self.objectList.remove(at: position)
    self.tableView.reloadData()
  }
}
-
- (void)performDelete:(long) position {
  // Get the object to delete with the index number of the tapped row.
  KiiObject *obj = _objectList[position];

  // Delete the object asynchronously.
  [obj deleteWithBlock:^(KiiObject *object, NSError *error) {
    if (error != nil) {
      [self showMessage:@"Delete failed" error:error];
      return;
    }

    // Remove the object from the object array and refresh the list.
    [self.objectList removeObject:obj];
    [self.tableView reloadData];
  }];
}
実行している処理はここまで見てきた内容と同様です。objectList から KiiObject を取り出し、ノンブロッキング API で Kii Cloud 上のデータを削除します。成功時は、項目を画面から削除します。
プログラムの説明は以上です。
Kii Cloud SDK の API を呼び出すだけでクラウド上のデータを操作できる点や、実装方法にはノンブロッキング API の呼び出しを利用するという特定のパターンがある点を理解できれば、他の機能も容易に実装できるはずです。
次は...
次は、リファレンスガイドを参照しながら機能を追加する手順を説明します。
プログラムの変更 に移動してください。
より詳しく学びたい方へ
- Object の作成方法の詳細は KiiObject の作成 を、検索方法の詳細は KiiObject の検索 をご覧ください。
- Object の URI と Object との関係は オブジェクトの ID と URI をご覧ください。たとえば、設定情報を 1 つの Object に格納して参照するような場合、URI を保存しておいて URI から Object を生成 するような使い方もできます。