Data Listing Screen Implementation
Finally, we will dive into the implementation of the data listing screen. This screen is implemented in the MainViewController.swift file and the MainViewController.m file.
The data listing screen is configured to be displayed as the next screen of the login screen in the storyboard.
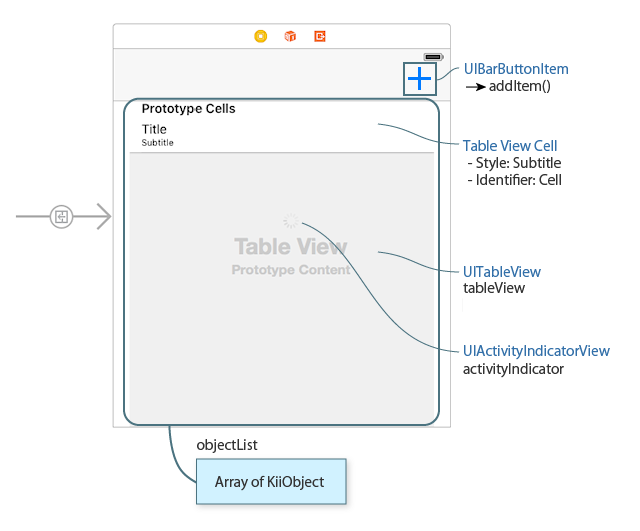
Screen components are associated with the implementation of the class via the storyboard as below:
The data to be listed is associated with the
tableViewproperty by an outlet. This property is a variable of theUITableViewclass.The data to be listed is managed by retaining the
objectListarray of KiiObjects within the class. The type of the array is[KiiObject]in Swift andNSMutableArrayin Objective-C.The table view cells in the
tableViewproperty are set to have the "Subtitle" style so that cells are displayed in the form of a title and a subtitle.Cellis set as an identifier.The "+" button is created in the navigation area on top of the page within the
viewDidLayoutSubviews()method. TheaddItem()method is set to be executed when this button is tapped.The activity indicator is associated with
activityIndicatorby an outlet to control animation while waiting (Details of the activity indicator is not covered in this tutorial).
Data structure
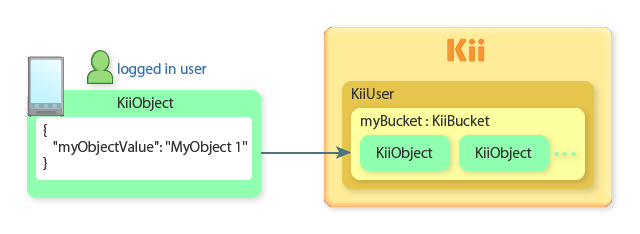
In the data listing screen, we create a KiiObject that has a key-value pair in JSON format and communicate it with Kii Cloud. The data will be stored in the bucket myBucket that is in the scope of the currently logged-in user.
We implement logic for creating, listing, and deleting KiiObjects in the mobile app.
Data
You can handle arbitrary data types and values as key-value pairs in JSON format in Kii Cloud.
In Hello Kii, the code specifies myObjectValue as the key name. The resulting data will be processed as a JSON string like the one in the above figure.
When you code your own program, you can use arbitrary keys and values including nested JSON data, according to the specification of your mobile app.
You do not need to define any value types beforehand with a schema and such. You just need to create a KiiObject in your code, and then you will be able to store and retrieve the data. Values stored at the top level of JSON data will be auto-indexed so that you can query KiiObjects at high speed.
Creating data
First, we will explain the process to create data.
The addItem() method is called when the "+" button is tapped in the navigation area. The following sample code is an excerpt from the code of this method.
-
objectCount += 1 let value = String(format: "MyObject %d", objectCount) let bucket = KiiUser.current()!.bucket(withName: bucketName) // Create a new KiiObject instance and set the key-value pair. let object = bucket.createObject() object.setObject(value, forKey: objectKey) // Save the object asynchronously. object.save { (object, error) -> Void in if error != nil { self.showMessage("Save failed", error: error as NSError?) return } // Insert the object at the beginning of the object array and refresh the list. self.objectList.insert(object, at: 0) self.tableView.reloadData() } -
NSString *value = [NSString stringWithFormat:@"MyObject %d", ++_objectCount];

KiiBucket *bucket = [[KiiUser currentUser] bucketWithName:BUCKET_NAME];

// Create a new KiiObject instance and set the key-value pair.
KiiObject *object = [bucket createObject];
[object setObject:value forKey:OBJECT_KEY];

// Save the object asynchronously.
[object saveWithBlock:^(KiiObject *object, NSError *error) {
  if (error != nil) {
    [self showMessage:@"Save failed" error:error];
    return;
  }

  // Insert the object at the beginning of the object array and refresh the list.
  [self.objectList insertObject:object atIndex:0];
  [self.tableView reloadData];
}];
objectCount, bucketName, and objectKey in the above sample code are declared as below:
-
fileprivate var objectCount = 0 fileprivate let bucketName = "myBucket" fileprivate let objectKey = "myObjectValue" -
@property int objectCount;
NSString * const BUCKET_NAME = @"myBucket";
NSString * const OBJECT_KEY = @"myObjectValue";
These steps are processed in order.
Create target data
We create the data value to store in a KiiObject as
value. In the code, we create the value with an incrementing number likeMyObject 1.Prepare a target bucket
We prepare a bucket in the scope of the currently logged-in user.
As described in the previous topic, you can get a
KiiUserinstance of the currently logged-in user with thecurrent()method. By executing thebucket(withName:)method against this instance, you can get a bucket in the scope of this user. The variablebucketNameis passed as the argument. This variable stores the name of the bucket to retrieve.If the bucket does not exist, it will be created when the data to store in the bucket is created. If the bucket already exists, this bucket will be retrieved.
In the sample code in Swift, forced unwrapping is used as seen in the
KiiUser.current()!to get aKiiUserinstance. This code assumes that the user is logged in when the code is executed. If it is unknown whether the user is logged in or not, branch the code using anifstatement or use optional chaining as used in theKiiUser.current()?with taking into account a possibility that theKiiUserinstance is nil.Prepare a target KiiObject
You can create a KiiObject in a bucket by executing the
createObject()method.The
setObject(_:forKey:)method sets a key-value pair in the top level of the JSON data of a KiiObject as below:{ "myObjectValue" : "MyObject 1" }Save the KiiObject
Execute the
save(_:)method to save the KiiObject. Step 1 to 3 are executed solely on the device, but this step will access Kii Cloud and save the KiiObject on Kii Cloud. Since this method involves network access, we use the non-blocking API.When the KiiObject is saved, the closure is called. The registered KiiObject is added to the top of
objectListwhen there is no error. At the same time, it is reflected on the screen through calling thereloadData()method againsttableView. An error message is displayed when there is any error.
Note that the data on the device is updated by adding new data to objectList while the save(_:) method updates the data on Kii Cloud.
Listing data
Data is listed when the data listing screen is displayed for the first time. Data is obtained from Kii Cloud and displayed with tableView when iOS calls the viewDidAppear(_:) method.
Retrieving data
The entire list is fetched by querying for all data in the bucket. The following sample code is an excerpt of the process.
-
override func viewDidAppear(_ animated: Bool) {
  // Clear all items.
  self.objectList.removeAll()

  // Create an empty KiiQuery. This query will retrieve all results sorted by the creation date.
  let allQuery = KiiQuery(clause: nil)
  allQuery.sort(byDesc: "_created")

  // Define the bucket to query.
  let bucket = KiiUser.current()!.bucket(withName: bucketName)

  // Perform the query.
  bucket.execute(allQuery) { (query, bucket, result, nextQuery, error) -> Void in
    ...
  }
}
-
- (void)viewDidAppear:(BOOL)animated {
  // Clear all items.
  [self.objectList removeAllObjects];

  // Create an empty KiiQuery. This query will retrieve all results sorted by the creation date.
  KiiQuery *allQuery = [KiiQuery queryWithClause:nil];
  [allQuery sortByDesc:@"_created"];

  // Define the bucket to query.
  KiiBucket *bucket = [[KiiUser currentUser] bucketWithName:BUCKET_NAME];

  // Perform the query.
  [bucket executeQuery:allQuery withBlock:^(KiiQuery *query, KiiBucket *bucket, NSArray *result, KiiQuery *nextQuery, NSError *error) {
    ...
  }];
}
These steps are processed.
Clear the list
We clear all the KiiObjects stored in
objectListto make sure proper listing.Prepare a query
We prepare a query for getting all data in the bucket.
First, we create a query object
allQuerywith theKiiQuery(clause:)method. An empty query (nil) is set because we want to get all KiiObjects.Then, we set the condition with the
sort(byDesc:)method to specify the sort order. This condition sorts the data in the descending order of the object creation time that is stored in the_createdfield. It is appropriate to sort data in the descending order because a new KiiObject is added to the top of the list as previously explained.The query API supports various query conditions such as comparing the string and numbers and concatenating multiple conditions with And/Or. The query is not made with the SQL; it is to be made with the condition expression that aligns with the target object structure.
Prepare a target bucket
We prepare a target bucket to query. Just like when we create the data, the variable
bucketNameis passed as the argument. This variable stores the name of the bucket to retrieve (myBucketin the scope of the logged-in user).Execute the query
We execute the query by passing the created
allQueryto theexecute(_:_:)method ofbucket.The query will access Kii Cloud via the network, so we use the non-blocking API. The callback will be explained in detail in the next section.
Processing retrieved data
The process in the closure displays data in the bucket if the query successfully fetched all data in the bucket.
-
bucket.execute(allQuery) { (query, bucket, result, nextQuery, error) -> Void in if error != nil { self.showMessage("Query failed", error: error as NSError?) return } // Add the objects to the object array and refresh the list. self.objectList.append(contentsOf: result as! [KiiObject]) self.tableView.reloadData() } -
[bucket executeQuery:allQuery withBlock:^(KiiQuery *query, KiiBucket *bucket, NSArray *result, KiiQuery *nextQuery, NSError *error) {
  if (error != nil) {
    [self showMessage:@"Query failed" error:error];
    return;
  }

  // Add the objects to the object array and refresh the list.
  [self.objectList addObjectsFromArray:result];
  [self.tableView reloadData];
}];
The following process is performed if the fetch was successful (or error is nil).
The query result is passed as
resultthat is an argument of the closure.resultcontains a list of fetched KiiObjects as an array. It is added to the end ofobjectList.The list is refreshed on the screen through calling the
reloadData()method againsttableView.
This implementation does not function correctly when the number of fetched objects is large. When the number is large, the executeQuery(_:_:) method returns the results in multiple pages by its pagination feature. To avoid complex implementation, Hello Kii processes only the first page.
Controlling the UITableView class
The UITableView class of iOS determines how to display the data list by methods of the UITableViewDataSource protocol.
First, we define a method that returns the number of sections in the list and a method that returns the number of rows as below. The list will have a single section and the number of rows in the list will be the number of items in objectList.
-
func numberOfSections(in tableView: UITableView) -> Int {
  // Return the number of sections.
  return 1
}

func tableView(_ tableView: UITableView, numberOfRowsInSection section: Int) -> Int {
  // Return the number of rows in the section.
  return objectList.count
}
-
- (NSInteger)numberOfSectionsInTableView:(UITableView *)tableView {
  // Return the number of sections.
  return 1;
}

- (NSInteger)tableView:(UITableView *)tableView numberOfRowsInSection:(NSInteger)section {
  // Return the number of rows in the section.
  return _objectList.count;
}
Next, we create table view cells. The list items are created by the tableView(_:cellForRowAt:) method of the UITableViewDataSource protocol.
In this tutorial, values are associated as below to display data.
See below for the process of the tableView(_:cellForRowAt:) method.
-
func tableView(_ tableView: UITableView, cellForRowAt indexPath: IndexPath) -> UITableViewCell {
  // Initialize a cell.
  var cell: UITableViewCell? = tableView.dequeueReusableCell(withIdentifier:"Cell", for:indexPath)
  if cell == nil {
    cell = UITableViewCell(style:UITableViewCellStyle.default, reuseIdentifier:"Cell")
  }

  // Fill the cell with data from the object array.
  let obj = objectList[indexPath.row]
  cell!.textLabel!.text! = obj.getForKey(objectKey) as! String
  cell!.detailTextLabel!.text! = obj.objectURI!
  return cell!
}
-
- (UITableViewCell *)tableView:(UITableView *)tableView cellForRowAtIndexPath:(NSIndexPath *)indexPath {
  // Initialize a cell.
  UITableViewCell *cell = [tableView dequeueReusableCellWithIdentifier:@"Cell" forIndexPath:indexPath];
  if (cell == nil) {
    cell = [[UITableViewCell alloc] initWithStyle:UITableViewCellStyleDefault reuseIdentifier:@"Cell"];
  }

  // Fill the cell with data from the object array.
  KiiObject *obj = _objectList[indexPath.row];
  cell.textLabel.text = [obj getObjectForKey:OBJECT_KEY];
  cell.detailTextLabel.text = obj.objectURI;
  return cell;
}
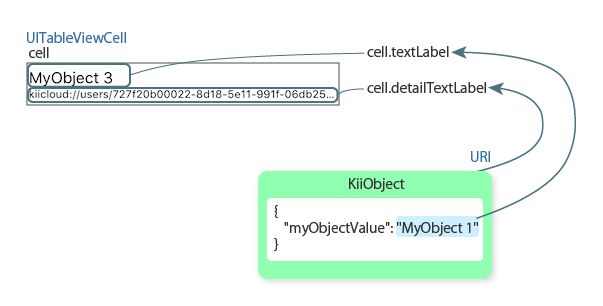
Data in a KiiObject is associated with a UITableViewCell instance as illustrated in the figure.
First, a UITableViewCell instance is created as a variable cell according to the standard method of iOS.
This method gets the index number (0, 1, 2, ...) of each array element from the row property of the argument indexPath. A KiiObject that is referred to by the index number is fetched in obj.
Next, the values in obj are set in the textLabel property and the detailTextLabel property of cell, because cell was set to have the Subtitle style in the storyboard.
textLabelThe value of
objectKey(themyObjectValuefield of the KiiObject) is set as the title. A string such asMyObject 1is obtained through thegetForKey(_:)method of the KiiObject.detailTextLabelThe value of
objectURI(URI of the KiiObject) is set as the subtitle.Kii Cloud uniquely identifies each KiiObject within an application with its URI. Note that you cannot use URI in the REST API.
Deleting data
You can delete an item by tapping it in the list. A confirmation message is displayed and the performDelete(_:) method below is executed when an item is deleted. The argument position receives the index number (0, 1, 2, ...) of an item to be deleted.
-
func performDelete(_ position: Int) {
  // Get the object to delete with the index number of the tapped row.
  let obj = objectList[position]

  // Delete the object asynchronously.
  obj.delete { (object, error) -> Void in
    if error != nil {
      self.showMessage("Delete failed", error: error as NSError?)
      return
    }

    // Remove the object from the object array and refresh the list.
    self.objectList.remove(at: position)
    self.tableView.reloadData()
  }
}
-
- (void)performDelete:(long) position {
  // Get the object to delete with the index number of the tapped row.
  KiiObject *obj = _objectList[position];

  // Delete the object asynchronously.
  [obj deleteWithBlock:^(KiiObject *object, NSError *error) {
    if (error != nil) {
      [self showMessage:@"Delete failed" error:error];
      return;
    }

    // Remove the object from the object array and refresh the list.
    [self.objectList removeObject:obj];
    [self.tableView reloadData];
  }];
}
The implementation is similar to what we've seen in other features. The KiiObject is taken out from objectList and deleted on Kii Cloud with the non-blocking API. If there is no error, the item is removed from the screen.
This ends explanation of the program.
We've shown that you can use APIs provided by the Kii Cloud SDK to manipulate data on the cloud. We've also presented when you should use non-blocking APIs. You should be able to start implementing other features easily by understanding these basics.
What's next?
We will explain how you can use our programming guide to start adding new features.
Go to Modify the Program.
If you want to learn more...
- See Creating a KiiObject to learn more details on how to create objects. Also, read Querying KiiObjects to learn more about how to query for objects.
- Object ID and URI covers the relationship between an object and its URI. If you want to cover a scenario like saving your app configuration in an object and later retrieving it, for example, the content covered in Getting a KiiObject will be helpful.