Login Screen Implementation
We will look into the login screen implementation. This screen is implemented in the LoginActivity.java file.
Screen components on the login screen are associated with the implementation of the class via the layout file login.xml as below:
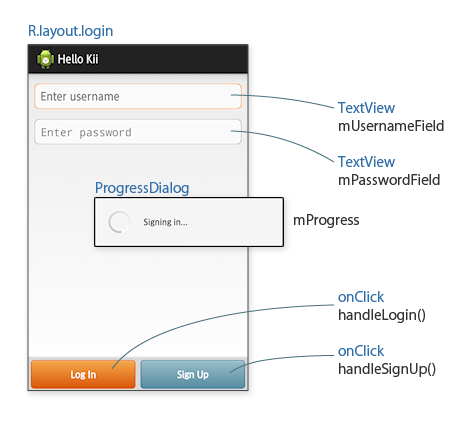
Two
TextViewsare associated with the Java fieldsmUsernameFieldandmPasswordFieldin theonCreate()method.The
onClickhandlers of the buttons are associated with thehandleLogin()method and thehandleSignUp()method.ProgressDialogis associated withmProgressto control animation while waiting (Details ofProgressDialogis not covered in this tutorial).
Creating a user
We will start with the user creation. When the "Sign Up" button is tapped, the handleSignUp() method is executed. The following sample code is an excerpt from this method (note that the excerpt is simplified):
String username = mUsernameField.getText().toString();
String password = mPasswordField.getText().toString();

// Create a KiiUser object.
KiiUser user = KiiUser.createWithUsername(username);

// Register the user asynchronously.
user.register(new KiiUserCallBack() {
  public void onRegisterCompleted(int token, KiiUser user, Exception e) {
    if (e == null) {
      // Go to the main screen.
      Intent myIntent = new Intent(LoginActivity.this, MainActivity.class);
      LoginActivity.this.startActivity(myIntent);
    } else {
      showToast("Error Registering: " + e.getLocalizedMessage());
    }
  }
}, password);
The username and password are fetched from the screen using the Android SDK. They are set in
usernameandpassword, respectively.usernameis passed to thecreateWithUsername()method to create aKiiUserinstance on memory.The
register()method is called. The SDK sends a request to Kii Cloud to create the specified user. Note thatpasswordis passed as the second argument of theregister()method.
Non-blocking API
The API that communicates with the server, like the register() method, is implemented as the non-blocking API. On Android, the user interface process is managed by the main thread. The whole mobile app will freeze if the main thread starts waiting for the network communication to finish. The non-blocking API is designed to solve this problem by not waiting for the network communication to finish.
The blocking API, on the other hand, will wait for the API execution to finish. The blocking API is to be used when you are creating a worker thread by yourself and executing the API from this thread. For most APIs, both blocking and non-blocking APIs are available. We present the sample code for both APIs in our programming guide.
The following sequence diagram illustrates how the non-blocking API works.
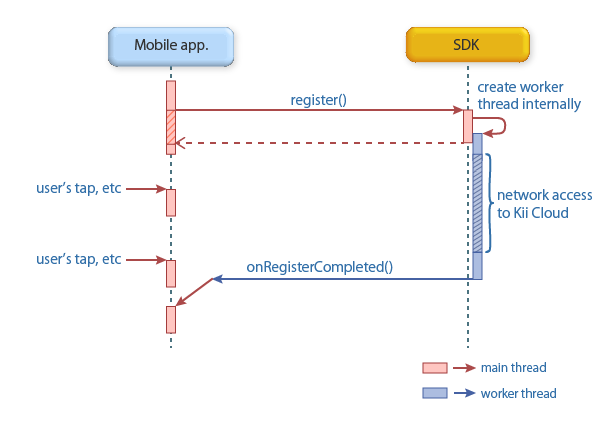
When the main thread calls the register() method, the SDK creates a worker thread internally and the method instantly returns control. The user can operate the screen while the network access process is ongoing, because the network call is made within the worker thread.
When the network call is finished and the next cycle of event processing starts, the main thread calls the onRegisterCompleted()method as the callback. Therefore, you do not need to worry about the thread synchronization in the callback.
Execution sequence
Be careful about the execution sequence.
// Step 1
user.register(user.register(new KiiUserCallBack() {
  public void onRegisterCompleted(int token, KiiUser user, Exception e) {
    // Step 3
  }
}, password);
// Step 2
In the above sample code, the place labeled as Step 3 is where you should write logic to be executed after the register() method is executed. The register() method is not yet complete when the place labeled as Step 2 is reached. If you write logic to be executed after the user registration in Step 2 by mistake, you will most likely encounter an error because the user registration process has just started.
When you are executing multiple APIs sequentially, you will need to write logic inside callback functions. This will make deeply nested code and make the code hard to read. To ensure code readability, you might use workarounds such as creating a worker thread by yourself and using the blocking API, and using a library that supports the Promise.
Execution result
You will write logic for handling the execution result inside the onRegisterCompleted() method of the KiiUserCallBack class.
The sample code in the programming guide shows which method of which class you should use to handle the API execution result. Check the sample case below to learn how to implement the logic.
Once again, here is an excerpt of the user registration logic:
// Register the user asynchronously.
user.register(new KiiUserCallBack() {
  public void onRegisterCompleted(int token, KiiUser user, Exception e) {
    if (e == null) {
      // Go to the main screen.
      Intent myIntent = new Intent(LoginActivity.this, MainActivity.class);
      LoginActivity.this.startActivity(myIntent);
    } else {
      showToast("Error Registering: " + e.getLocalizedMessage());
    }
  }
}, password);
When handling the API execution result, you need to check if there is any exception thrown. Non-blocking API execution will trigger the network communication, so there is always a chance of error, such as a network error, to be caused. This applies to all non-blocking APIs, not only to the register() method.
In Hello Kii, we handle the result as follows:
When the execution succeeded
If the
Exceptionvariableeis null, the execution was successful. The user is registered and logged in.MainActivityis called to bring the data listing screen up.The state of the logged-in user is stored in a static variable within the SDK. You can use this variable in
MainActivity.When the execution failed
If the
Exceptionvariableeis not null, the variable stores an exception thrown in the SDK. We get the message with thegetLocalizedMessage()method and show the toast on the screen.If you want to handle individual error cases, you can use the
instanceofoperator ofeor check the error code.
The argument token of the onRegisterCompleted() method is the identifier of the asynchronous process, but this is now deprecated. Ignore it when you implement your application.
Login
The implementation of the login process is almost the same as that of the user registration. Only the difference is the API that is executed in the logic.
When the "Log In" button is tapped, the handleLogIn() method is executed. The following sample code is an excerpt of this method:
String username = mUsernameField.getText().toString();
String password = mPasswordField.getText().toString();

// Authenticate the user asynchronously.
KiiUser.logIn(new KiiUserCallBack() {
  public void onLoginCompleted(int token, KiiUser user, Exception e) {
    if (e == null) {
      // Go to the main screen.
      Intent myIntent = new Intent(LoginActivity.this, MainActivity.class);
      LoginActivity.this.startActivity(myIntent);
    } else {
      showToast("Error registering: " + e.getLocalizedMessage());
    }
  }
}, username, password);
Just like the user registration logic, we get the username and password from the screen using the Android SDK.
Then, we pass these values to the logIn() method and start the login process. If the username and password are valid, the mobile app will be in the logged in state.
The logIn() method is a non-blocking API that causes network communication, so we write logic to process the result inside the onLoginCompleted() method.
When the execution succeeded
If the
Exceptionvariableeis null, the login is successful. We will move toMainActivity.The state of the logged-in user is stored in a static variable within the SDK. You can use this variable in
MainActivity.When the execution failed
If the
Exceptionvariableeis not null, we display the error message in the same way as done for the user registration.
Current user
As already mentioned, once the user is logged in or successfully registered, the login state of this user is kept in the SDK as the "current user". You can get the current user as follows:
KiiUser user = KiiUser.getCurrentUser();
This user is the one that you get as the argument user of the callback in the login method.
Once you have the user, you can make various operations like accessing buckets of this user's scope.
If the process is relaunched by Android (e.g., when the mobile app goes to background), the login state preserved in the static variable is lost and getCurrentUser() method will return null. In developing a real application, you would need to implement a logic to secure the login state. Check the bottom of this page for the reference. Note that Hello Kii does not implement this logic.
What's next?
We will explore how the data listing screen is implemented. We will check how the data registration and retrieval are handled.
Go to Data Listing Screen Implementation.
If you want to learn more...
- See Blocking vs. Non-Blocking API for more discussion on the blocking and non-blocking API.
- See Signing up and Logging in for the details on how to implement the user registration and login.
- The term "login state" on this page refers to an access token. See Logging in and Using an Access Token to learn more.
- See Tips for Implementing with Android to learn how you can preserve the login state even if the Activity is relaunched by Android. See Login with the Auto-Saved Credentials if you want to learn how to preserve and reuse the state when the mobile app is newly launched. You can check the actual implementation example in Kii Balance.