Data Listing Screen Implementation
Next, we will dive into the implementation of the data listing screen.
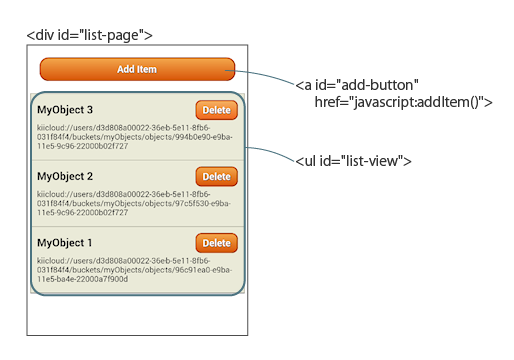
Just like the login screen, the data listing screen is defined within a <div> element in the index.html file and configured with IDs and JavaScript functions. See the below figure.
JavaScript for this page is implemented in the list-page-callback.js file.
This screen lists data with the HTML <ul> tag. The index.html file contains an empty <ul> element. <li> elements in the <ul> element are edited using DOM when the screens are switched or data is updated.
Data structure
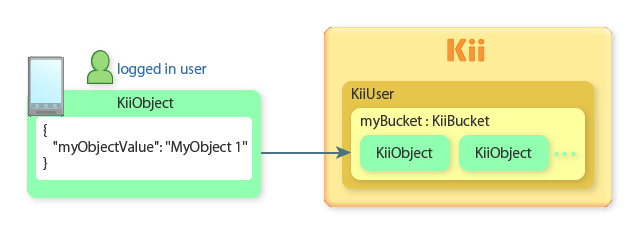
In the data listing screen, we create a KiiObject that has a key-value pair in JSON format and communicate it with Kii Cloud. The data will be stored in the bucket myBucket that is in the scope of the currently logged-in user.
We implement logic for creating, listing, and deleting KiiObjects in the mobile app.
Data
You can handle arbitrary data types and values as key-value pairs in JSON format in Kii Cloud.
In Hello Kii, the code specifies myObjectValue as the key name. The resulting data will be processed as a JSON string like the one in the above figure.
When you code your own program, you can use arbitrary keys and values including nested JSON data, according to the specification of your mobile app.
You do not need to define any value types beforehand with a schema and such. You just need to create a KiiObject in your code, and then you will be able to store and retrieve the data. Values stored at the top level of JSON data will be auto-indexed so that you can query KiiObjects at high speed.
Listing data
The data listing screen opens when a user is created or authenticated in the login screen.
These steps are processed in order.
- Switching the screens
- Retrieving data
- Processing retrieved data
Each step is explained below.
Switching the screens
The openListPage() function is called after successful login or user creation. This function switches the screens and clears the list to initialize the screen.
The following sample code is an excerpt from this function.
function openListPage() {
  document.getElementById("login-page").style.display = "none";
  document.getElementById("list-page").style.display = "block";

  // Clear the existing objects from the list.
  var listView = document.getElementById("list-view");
  listView.innerHtml = "";

  ......
}
Hello Kii performs screen transition by switching the display property of the style object in DOM. The login screen is set to be hidden and the data listing screen is set to be visible.
After the screen is switched, the list is initialized to make sure proper listing. All child elements of the list are deleted by emptying the innerHtml property of the <ul> element listView.
Retrieving data
Next, KiiObjects to be displayed on the screen are fetched from Kii Cloud.
The entire list is fetched by querying for all data in the Bucket. The openListPage() function, which was mentioned earlier, continues as below:
function openListPage() {
  ......

  // Create an empty KiiQuery. This query will retrieve all results sorted by the creation date.
  var queryObject = KiiQuery.queryWithClause(null);
  queryObject.sortByDesc("_created");

  // Get the defined bucket belonging to the user.
  var bucket = KiiUser.getCurrentUser().bucketWithName(BUCKET_NAME);

  // Perform the query asynchronously.
  bucket.executeQuery(queryObject, {
    // If the query succeeded
    success: function(queryPerformed, resultSet, nextQuery) {
      ......
    },
    // If the query failed
    failure: function(queryPerformed, errorString) {
      alert("Unable to execute query: " + errorString);
      console.log("Unable to execute query: " + errorString);
    }
  });
}
The BUCKET_NAME in the above sample code is declared as below:
var BUCKET_NAME = "myBucket";
This variable is used in the following steps.
Prepare a query
We prepare a query for getting all data in the bucket.
First, we create a query object
queryObjectwith thequeryWithClause()method. An empty query (null) is set because we want to get all KiiObjects.Then, we set the condition with the
sortByDesc("_created")method to specify the sort order. This condition sorts the data in the descending order of the object creation time that is stored in the_createdfield. It is appropriate to sort data in the descending order because a new KiiObject is added to the top of the list according to the specification.The query API supports various query conditions such as comparing the string and numbers and concatenating multiple conditions with And/Or. The query is not made with the SQL; it is to be made with the condition expression that aligns with the target object structure.
Prepare a target bucket
We prepare a target bucket to query. Just like when we create the data, the variable
BUCKET_NAMEis passed as the argument. This variable stores the name of the bucket to retrieve (myBucketin the scope of the logged-in user).Execute the query
We execute the query by passing
queryObjectthat was created in Step 1 to theexecuteQuery()method ofbucketas the first argument.The query execution will access Kii Cloud via the network, so we are using the non-blocking API.
The callback functions for success and failure are specified in the
executeQuery()method. See the next section for the process after a successful query. The error message is output to the screen and the console after a failed query.
Processing retrieved data
The callback function in the success block displays data if the query successfully fetched all data in the bucket.
bucket.executeQuery(queryObject, {
  // If the query succeeded
  success: function(queryPerformed, result, nextQuery) {
    console.log("Execute query: got " + result.length + " objects");

    // Iterate through the result set.
    for(var i = 0; i < result.length; i++) {
      // Create a row element with the object.
      var row = createListItem(result[i]);
      listView.appendChild(row);
    }
  },
  ......
});
The following process is performed if the fetch was successful.
The argument result of the callback function in the success block contains fetched KiiObjects in an array. The objects are retrieved one by one using the loop and added to listView as a screen element. listView already has the DOM element that corresponds to the <ul> element.
The createListItem() function creates items to be added. See the next section for more information.
This implementation does not function correctly when the number of fetched objects is large. When the number is large, the executeQuery() method returns the results in multiple pages by its pagination feature. To avoid complex implementation, Hello Kii processes only the first page. See "If you want to learn more..." at the bottom of this topic for a practical implementation method.
Displaying list elements
The createListItem() function creates one item in the list. It fetches data from a KiiObject and returns a DOM element that corresponds to the <li> element.
In this tutorial, a structure is created as shown in the below figure.
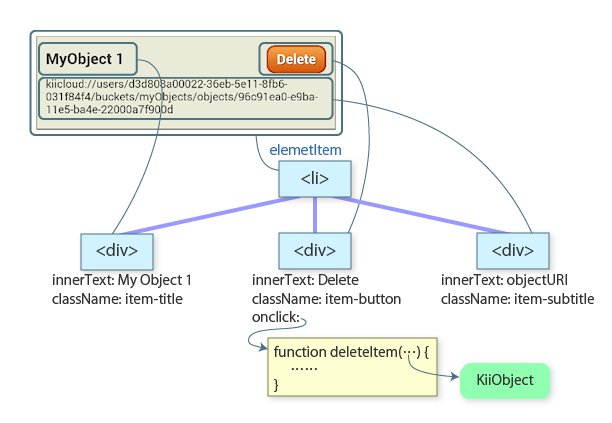
The function creates each DOM element and sets the innerText property that holds text to be displayed in the list and the className property that holds the class attribute from the style sheet. Additionally, the handler for item deletion is assigned to the "Delete" button.
The below implementation composes the screen. These processes should be replaced with framework-dependent processes if you use any frameworks.
function createListItem(object) {
  // Create elements of the list item.
  var elementItem = document.createElement('li');
  var elementTitle = document.createElement('div');
  var elementSubtitle = document.createElement('div');
  var elementDelete = document.createElement('div');

  // Set the value of each element.
  elementTitle.innerText = object.get(OBJECT_KEY);
  elementTitle.className = "item-title";

  elementSubtitle.innerText = object.objectURI();
  elementSubtitle.className = "item-subtitle";

  elementDelete.innerText = "Delete";
  elementDelete.className = "item-button";
  elementDelete.onclick = function (e) { deleteItem(this.parentNode, object); };

  // Set the elements as children of the list item.
  elementItem.appendChild(elementTitle);
  elementItem.appendChild(elementDelete);
  elementItem.appendChild(elementSubtitle);

  return elementItem;
}
Pay attention to these points:
The value of
OBJECT_KEY(themyObjectValuefield of the KiiObject) is set as the title. A string such asMyObject 1is obtained through theget()method of the KiiObject.The URI of the KiiObject is set as the subtitle. Kii Cloud uniquely identifies each KiiObject within an application with its URI. Note that you cannot use URI in the REST API.
The
deleteItem()function andobjectthat is the target KiiObject for deletion are specified as the handler of theonclickevent of the "Delete" button. Thisobjectis theobjectpassed to thecreateListItem()function.Finally,
elementItemthat is the created<li>element is returned as the return value of the function.
The above code directly sets the function as the handler of the onclick event for simplicity and will cause memory leak when elements are deleted.
Creating data
Next, we will explain the process to create data.
The addItem() function is called when the "Add Item" button is clicked. The following sample code is an excerpt from the code of this function.
function addItem() {
  var value = "MyObject " + (++objectCount);

  var bucket = KiiUser.getCurrentUser().bucketWithName(BUCKET_NAME);

  // Create a new KiiObject instance and set the key-value pair.
  var obj = bucket.createObject();
  obj.set(OBJECT_KEY, value);

  // Save the object asynchronously.
  obj.save({
    // If the object was saved
    success: function(theSavedObject) {
      console.log("Save succeeded: " + JSON.stringify(theSavedObject));

      // Insert the object at the top of the list.
      var row = createListItem(theSavedObject);
      var listView = document.getElementById("list-view");
      listView.insertBefore(row, listView.firstChild);
    },
    // If the object was not saved
    failure: function(theObject, errorString) {
      alert("Unable to create object: " + errorString);
      console.log("Unable to create object: " + errorString);
    }
  });
}
objectCount, BUCKET_NAME and OBJECT_KEY in the above sample code are declared as below:
var objectCount = 0;
var BUCKET_NAME = "myBucket";
var OBJECT_KEY = "myObjectValue";
These steps are processed in order.
Create target data
We create the data value to store in a KiiObject as
value. In the code, we create the value with an incrementing number likeMyObject 1.Prepare a target bucket
We prepare a bucket in the scope of the currently logged-in user.
As described in the previous topic, you can get a
KiiUserinstance of the currently logged-in user with thegetCurrentUser()method. By executing thebucketWithName()method against this instance, you can get a bucket in the scope of this user. The variableBUCKET_NAMEis passed as the argument. This variable stores the name of the bucket to retrieve.If the bucket does not exist, it will be created when the data to store in the bucket is created. If the bucket already exists, this bucket will be retrieved.
Prepare a target KiiObject
You can create a KiiObject in a bucket by executing the
createObject()method.The
set()method sets a key-value pair in the top level of the JSON data of a KiiObject as below:{ "myObjectValue" : "MyObject 1" }Save the KiiObject
Execute the
save()method to save the KiiObject. Step 1 to 3 are executed solely on the device, but this step will access Kii Cloud and save the KiiObject on Kii Cloud. Since this method involves network access, we use the non-blocking API.When the KiiObject is saved, the callback function is called. The
createListItem()function that was explained earlier creates an<li>element and adds it to the top of the list using DOM when there is no error.If there is an error, the error message is output to the screen and the console.
Deleting data
You can delete an item by clicking the "Delete" button in the list.
When the screen is composed, the "Delete" button, the deleteItem() function, and the KiiObject to delete are associated.
Clicking the "Delete" button invokes the deleteItem() function. As the arguments, elementItem has the <li> element from DOM and object has the KiiObject to delete.
function deleteItem(elementItem, object) {
  // Delete the object asynchronously.
  object.delete({
    // If the object was deleted
    success: function(theDeletedObject) {
      console.log("Delete succeeded: " + JSON.stringify(theDeletedObject));

      var listView = document.getElementById("list-view");
      listView.removeChild(elementItem);
    },
    // If the object was not deleted
    failure: function(theObject, errorString) {
      alert("Unable to delete object: " + errorString);
      console.log("Unable to delete object: " + errorString);
    }
  });
}
The implementation is the same as what we've seen in other features. The delete() method of the KiiObject passed as an argument is called and the data on Kii Cloud is deleted with the non-blocking API. If there is no error, the <li> element is removed from the screen using DOM.
We are now done with walking through an implementation with callbacks.
We've shown that you can use APIs provided by the Kii Cloud SDK to manipulate data on the cloud. We've also presented when you should use non-blocking APIs. You should be able to start implementing other features easily by understanding these basics.
What's next?
We will explain how you can use our programming guide to start adding new features.
Go to Modify the Program.
If you want to learn more...
- See Creating a KiiObject to learn more details on how to create objects. Also, read Querying KiiObjects to learn more about how to query for objects. Especially, the query topic describes how to implement pagination. Refer to the topic if you have numerous data.
- Object ID and URI covers the relationship between an object and its URI. If you want to cover a scenario like saving your app configuration in an object and later retrieving it, for example, the contents covered in Getting a KiiObject will be helpful.