Editing an Entry
The edit feature in the data listing screen has two major steps: editing an entry and accessing Kii Cloud.
Follow a common development method for Android apps to develop the step of editing an entry. That is, edit an entry with the
DialogFragmentclass and receive the result with theBalanceListFragmentclass. You can skip the Editing an entry section below if you are familiar with fragment implementation.Update the entry data by Calling the Kii Cloud features. In this step, call Kii Cloud APIs to update the data on Kii Cloud according to the data obtained from the dialog.
Check the following files for the source code.
Editing an entry
The user edits income and expense data in the data listing screen. To add an entry, the user taps the "+" button in the lower right of the screen. To update or delete an entry, the user taps it in the list.
Kii Balance edits an entry with the BalanceListFragmnet class and the ItemEditDialogFragment class. The figure below shows the interaction between the classes for editing an entry.

When the "+" button is tapped, the add dialog is called with the request code REQUEST_ADD. When an entry in the list is tapped, the edit dialog is called with the request code REQUEST_EDIT. In either case, initial values to be displayed on the dialog are passed to the ItemEditDialogFragment class.
When any of the "ADD", "DELETE", or "UPDATE" buttons is tapped on the dialog, a corresponding value (ACTION_ADD, ACTION_DELETE, or ACTION_UPDATE) is set as the action of an Intent instance and the onActivityResult() method is called.
The onActivityResult() method in the BalanceListFragment class performs the following tasks according to the request code and the action set to the Intent instance.
@Override
public void onActivityResult(int requestCode, int resultCode, Intent data) {
  if (resultCode != Activity.RESULT_OK) { return; }

  switch (requestCode) {
  case REQUEST_ADD: {
    String name = data.getStringExtra(ItemEditDialogFragment.RESULT_NAME);
    int type = data.getIntExtra(ItemEditDialogFragment.RESULT_TYPE, Field.Type.EXPENSE);
    int amount = data.getIntExtra(ItemEditDialogFragment.RESULT_AMOUNT, 0);

    createObject(name, type, amount);
    break;
  }
  case REQUEST_EDIT: {
    String action = data.getAction();
    String objectId = data.getStringExtra(ItemEditDialogFragment.RESULT_OBJECT_ID);
    String name = data.getStringExtra(ItemEditDialogFragment.RESULT_NAME);
    int type = data.getIntExtra(ItemEditDialogFragment.RESULT_TYPE, Field.Type.EXPENSE);
    int amount = data.getIntExtra(ItemEditDialogFragment.RESULT_AMOUNT, 0);

    if (ItemEditDialogFragment.ACTION_UPDATE.equals(action)) {
        updateObjectInList(objectId, name, type, amount);
    } else {
        deleteObject(objectId);
    }
    break;
  }
  }
  super.onActivityResult(requestCode, resultCode, data);
}
If an entry is added, that is notified with the request code REQUEST_ADD. Therefore, the createObject() method is called to create a KiiObject.
If an entry is edited or deleted, that is notified with the request code REQUEST_EDIT and the action set to the intent. If the action is ACTION_UPDATE, the updateObjectInList() method updates a corresponding KiiObject. Otherwise (if the action is ACTION_DELETE), the deleteObject() method deletes a corresponding KiiObject.
For information about the other functions of this implementation, check the source code at BalanceListFragment and ItemEditDialogFragment directly.
Calling the Kii Cloud features
After the input is completed in the dialog, the onActivityResult() method adds, updates, or deletes a KiiObject.
Adding a KiiObject
A KiiObject is added to a bucket in the current user's scope. The method to create a KiiObject is the same as that for Hello Kii.
Kii Balance creates the following key-value pairs for a KiiObject.
name: The description of the income or expense entry.type: The type of the entry that is 1 for income and 2 for expense.amount: The amount of the entry in cents. It is 100 times the amount that is displayed on the screen.
Aside from the above pairs, predefined fields such as the creation time _created are automatically created.
See the code below for creating a KiiObject. Note that the excerpt is simplified.
private void createObject(String name, int type, int amount) {
  KiiUser user = KiiUser.getCurrentUser();
  KiiBucket bucket = user.bucket(Constants.BUCKET_NAME);
  KiiObject object = bucket.object();

  object.set(Field.NAME, name);
  object.set(Field.TYPE, type);
  object.set(Field.AMOUNT, amount);

  object.save(new KiiObjectCallBack() {
    @Override
    public void onSaveCompleted(int token, KiiObject object, Exception e) {
      if (e != null) {
        ViewUtil.showToast(getActivity(), e.getMessage());
        return;
      }

      ViewUtil.showToast(getActivity(), R.string.add_succeeded);
      addObjectToList(object);
    }
  });
}
Updating a KiiObject
A KiiObject is updated with values specified as method arguments.
The KiiObject ID is passed as an argument to the update-related methods. When an entry in the data listing screen is tapped, the onListItemClick() method passes the ID of a corresponding KiiObject to the edit dialog. After the input is completed in the dialog, the ID is passed to the updateObjectInList() method.
The entry name, type, and amount are passed as arguments as well. These values are used to update the KiiObject.
See the code below for updating a KiiObject.
private void updateObjectInList(final String objectId, String name, int type, int amount) {
  KiiUser user = KiiUser.getCurrentUser();
  KiiBucket bucket = user.bucket(Constants.BUCKET_NAME);
  KiiObject object = bucket.object(objectId);

  object.set(Field.NAME, name);
  object.set(Field.TYPE, type);
  object.set(Field.AMOUNT, amount);

  object.save(new KiiObjectCallBack() {
    @Override
    public void onSaveCompleted(int token, KiiObject object, Exception e) {
      if (e != null) {
        ViewUtil.showToast(getActivity(), e.getMessage());
        return;
      }
      ViewUtil.showToast(getActivity(), R.string.update_succeeded);
      updateObjectInList(object, objectId);
    }
  });
}
The object() method is executed against the bucket in the current user's scope to instantiate the target KiiObject with the KiiObject ID specified as the argument. Then the save() method is called.
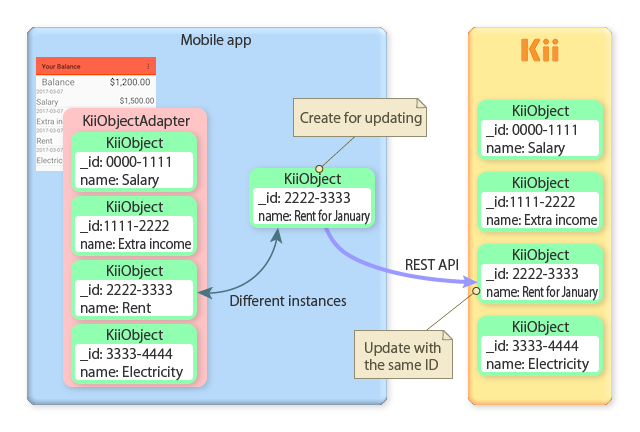
The KiiObject is correctly updated even though the save() method and the KiiObjectAdapter instance handle different Java instances of the same KiiObject. The KiiObject is correctly updated on Kii Cloud as far as the KiiObject ID and the bucket name are correct in the URL for the REST API.
If the update on Kii Cloud is successful, the updateObjectInList() method replaces a corresponding KiiObject instance in the KiiObjectAdapter instance.
Alternatively, you can get a KiiObject instance from the KiiObjectAdapter instance, update it, and call the save() method. However, you need to add a rollback step to this implementation. When an error occurs, the updated values in the KiiObject on the client need to be reset to the previous values.
Choosing the update method
Kii Cloud provides the following three methods for updating a KiiObject. Kii Balance uses the partial update method without overwrite check.
Full update without overwrite check
This method completely replaces the key-value pairs in a KiiObject on the server with the key-value pairs sent from the client. Any existing pairs on the server will be deleted.
This method does not check if another client has updated the KiiObject.
Partial update without overwrite check
This method merges the key-value pairs in a KiiObject on the client to the key-value pairs on the server. As a result, any existing pairs on the server will remain if they are not updated by the set of pairs sent from the client.
This method does not check if another client has updated the KiiObject.
Full update with overwrite check
This method completely replaces the key-value pairs in a KiiObject on the server with the key-value pairs sent from the client. Any existing pairs on the server will be deleted.
If another client has updated the KiiObject since it was downloaded to the client, an error will occur.
For more information about the behaviors of these methods, see Updating a KiiObject.
Kii Balance would correctly work with the partial update method because the keys in the key-value pairs sent from the client are always the same as those on the server.
Kii Balance does not perform overwrite check because there should be no overwrite error for data in the user scope. If your mobile app will write in a group scope or the application scope, it is safer to apply the update method with overwrite check because multiple users might update the same KiiObject at the same time.
When you design your mobile app, consider usage conditions before deciding the update method. Such conditions include if the update should be incremental and if concurrent access can occur.
Deleting a KiiObject
A KiiObject is deleted by its ID.
See the code below for deleting a KiiObject.
private void deleteObject(final String objectId) {
  KiiUser user = KiiUser.getCurrentUser();
  KiiBucket bucket = user.bucket(Constants.BUCKET_NAME);
  KiiObject object = bucket.object(objectId);

  object.delete(new KiiObjectCallBack() {
    @Override
    public void onDeleteCompleted(int token, Exception e) {
      if (e != null) {
        ViewUtil.showToast(getActivity(), e.getMessage());
        return;
      }
      ViewUtil.showToast(getActivity(), R.string.delete_succeeded);
      removeObjectFromList(objectId);
    }
  });
}
The deletion process is similar to the update process. The target KiiObject is instantiated by its ID and then the delete() method is called for deleting the KiiObject on Kii Cloud.
After the deletion is completed, the removeObjectFromList() method deletes a corresponding KiiObject instance in the KiiObjectAdapter instance.
This is the end of the tutorial for Android. For further analysis, go through the source code by using Class Structure as a reference.
What's Next?
Let us review the iOS app in detail.
Go to iOS Mobile App.
If you skip the section for the iOS app, we discuss tips for data design and considerations for implementation at the end of the tutorial. Those would help you with designing a practical mobile app.