Implemented Technique: Fragments
Hello Kii opens an appropriate screen by starting activities in sequence. In order to develop a full-scale Android app, it would be more suitable to use fragments.
A fragment is a mechanism to create a user interface component within an activity. You can easily modularize views inside an activity and perform view transitions with fragments.
Kii Balance uses fragments for screen and dialog transitions. Data passing required for such transitions is also done with the framework of the fragment.
First, let us see how to switch screens and dialogs with fragments. Then we review how to instantiate a fragment and pass data to it. For the dialogs, we also see how to get user input (For the screens of Kii Balance, you only set data).
The support library (com.android.support:appcompat-v7) and the Android OS provide fragments with the same functionality. Kii Balance is implemented with fragments from the support library because the implementation with the Android OS depends on the OS version. Note that the used Fragment class is not from the android.app.Fragment package but the android.support.v4.app.Fragment package.
Scope of this topic
Fragments can serve for a wide range of purposes and it might not be easy to fully master fragments. This topic covers limited information about an implementation technique for building a practical mobile app. For more information about implementation with fragments, see the Android Developer website.
Screen switching with fragments
The figure below indicates the fragment classes used in Kii Balance. Let us see how to implement screen and dialog transitions.

Screen transitions with fragments
Kii Balance uses fragment transactions to switch the title screen and the data listing screen. You can manipulate (add, delete, and replace) a fragment in an activity by performing a fragment transaction.
You can switch the screens by replacing the R.id.main element with a subclass of the Fragment class. This element is included in the view that makes the activity.
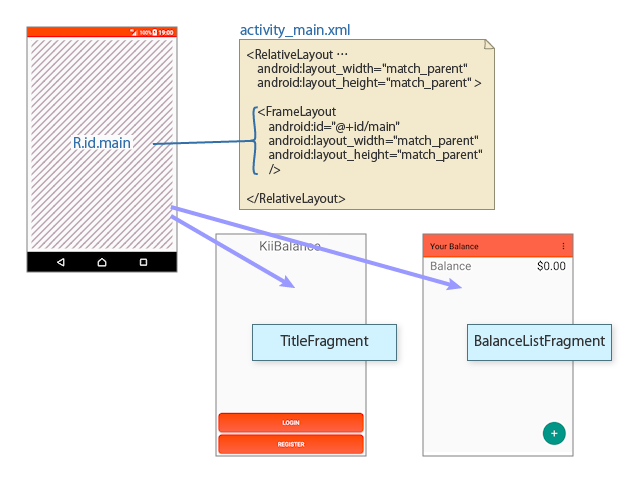
The fragment replacement is implemented in the toNextFragment() method of the ViewUtil class. Use a FragmentTransaction object to replace the R.id.main element with the fragment specified in next.
public static void toNextFragment(FragmentManager manager, Fragment next, boolean addBackStack) {
  if (manager == null) { return; }
  FragmentTransaction transaction = manager.beginTransaction();
  if (addBackStack) {
    transaction.addToBackStack("");
  }
  transaction.replace(R.id.main, next);
  transaction.commit();
}
The addBackStack argument specifies whether the current fragment should be put on the stack when a fragment transition occurs.
If the addBackStack argument is true, the addToBackStack() method saves the current fragment on the stack and then the replace() method replaces the fragment. In this case, the user can return to previous screens by tapping the back button. Tapping the back button restores the saved fragments on the stack in order. If the user taps the back button when the stack is empty, the activity will be shut down.
The addBackStack argument is always false in Kii Balance because it does not support transitions with the back button.
Displaying dialogs with fragments
You can display a subclass of the DialogFragment class also as a dialog on the screen. This capability is a part of the fragment implementation.
As shown in the class diagram above, the subclasses of the DialogFragment class provide the functions of logging in, registering a user, adding and editing an entry, and displaying the progress of a task.
All of the subclasses display the dialog in the same way. The BalanceListFragment class has the following lines for displaying the add dialog.
ItemEditDialogFragment dialog = ItemEditDialogFragment.newInstance(this, REQUEST_ADD, null, "", Field.Type.INCOME, 0);
dialog.show(getFragmentManager(), "");
The first line instantiates a DialogFragment object. For more information, see the next section.
The show() method provided by the DialogFragment class displays a fragment as a dialog. The second argument holds a tag for the fragment for future reference. In all the subclasses but the ProgressDialogFragment class, an empty string is specified because the argument is not used.
If you are interested, look at the implementation of the show() method in the support library. You can see that the method uses the FragmentTransaction class to display a fragment as a dialog as with a case of displaying a screen.
public void show(FragmentManager manager, String tag) {
  ...
  FragmentTransaction ft = manager.beginTransaction();
  ft.add(this, tag);
  ft.commit();
}
Instantiating a fragment and setting values
For screen and dialog transitions, you need to instantiate the target fragment in a special manner. This section explains how to instantiate a fragment so that the caller can pass values to a dialog.
The sample code in this section explains only a method to pass data as arguments with the framework of the fragment. The role of each argument within the application is explained later.
Incorrect instantiation
First, see the incorrect implementation below.
The sample code below is intended to display the add dialog by creating an ItemEditDialogFragment instance with several arguments. But it does not work.
// This sample code does not work properly.
ItemEditDialogFragment dialog = new ItemEditDialogFragment(this, REQUEST_ADD, null, "", Field.Type.INCOME, 0);
dialog.show(getFragmentManager(), "");
// This sample code does not work properly.
public class ItemEditDialogFragment extends DialogFragment {
  private String mObjectId;
  private String mName;
  private int mType;
  private int mAmount;

  public ItemEditDialog(Fragment target, int requestCode,
          String objectId, String name, int type, int amount) {
    setTargetFragment(target, requestCode);
    mObjectId = objectId;
    mName = name;
    mType = type;
    mAmount = amount;
  }
}
The Android OS destroys and recreates an activity according to the state of the OS at any time. A fragment within the activity is also destroyed and recreated at the same time.
When a fragment is recreated, you cannot directly pass arguments to its constructor because the constructor is called by the OS. You must use a default constructor.
Correct instantiation
You need a default constructor to implement a fragment correctly.
In order to recreate a fragment with a default constructor, pass arguments to the constructor via the Bundle class.
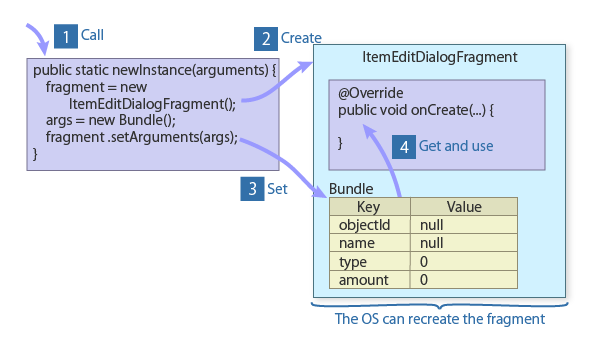
- Call a public factory method of a subclass of the
Fragmentclass. - Create a fragment instance with a default constructor.
- Store arguments in a
Bundleinstance and set it to the fragment. - Get and use the values from the
Bundleinstance in a method of the fragment such asonCreate().
A Bundle instance is managed by the support library and the OS. Therefore, a fragment is recreated together with its arguments when an activity is recreated.
One of the implementations of this type of processing in Kii Balance is shown below. We have seen this code in the BalanceListFragment class earlier; it calls the dialog and corresponds to ![]() in the figure.
in the figure.
ItemEditDialogFragment dialog = ItemEditDialogFragment.newInstance(this, REQUEST_ADD, null, "", Field.Type.INCOME, 0);
dialog.show(getFragmentManager(), "");
The ItemEditDialogFragment class creates an instance as below with the factory method newInstance().
public class ItemEditDialogFragment extends DialogFragment {
  private static final String ARGS_OBJECT_ID = "objectId";
  private static final String ARGS_NAME = "name";
  private static final String ARGS_TYPE = "type";
  private static final String ARGS_AMOUNT = "amount";

  private String mObjectId;
  private String mName;
  private int mType;
  private int mAmount;

  public static ItemEditDialogFragment newInstance(Fragment target, int requestCode,
          String objectId, String name, int type, int amount) {
    ItemEditDialogFragment fragment = new ItemEditDialogFragment();
    fragment.setTargetFragment(target, requestCode);

    Bundle args = new Bundle();
    args.putString(ARGS_OBJECT_ID, objectId);
    args.putString(ARGS_NAME, name);
    args.putInt(ARGS_TYPE, type);
    args.putInt(ARGS_AMOUNT, amount);
    fragment.setArguments(args);
    return fragment;
  }

  @Override
  public void onCreate(Bundle savedInstanceState) {
    super.onCreate(savedInstanceState);

    Bundle args = getArguments();
    mObjectId = args.getString(ARGS_OBJECT_ID);
    mName = args.getString(ARGS_NAME);
    mType = args.getInt(ARGS_TYPE);
    mAmount = args.getInt(ARGS_AMOUNT);
  }
}
The factory method newInstance() creates a fragment instance.
Note that, in the viewpoint of passing arguments, this method provides the same functionality as the constructor with arguments in the erroneous example.
The above code processes the following tasks.
Specify values to pass to the instance as arguments of the
newInstance()method. Those values were specified as arguments of the constructor in the erroneous example.Create a fragment instance with the default constructor in the
newInstance()method ( in the figure). Then, create a
 Bundleinstance and store values in it for passing them to the fragment. Use thesetArguments()method to store theBundleinstance in the fragment ( in the figure). The
 setArguments()method is a standard method of theFragmentclass.On the fragment side, get the values stored in the
Bundleinstance in an initialization event such as theonCreate()method and theonCreateDialog()method ( in the figure).
The other classes are implemented in a similar way to this implementation of the ItemEditDialogFragment class. A similar implementation is also provided in a skeleton created for a new fragment in Android Studio.
Getting return values from a dialog
This section explains how to receive values from a dialog.
The sample code in this section explains only a method to receive data as return values with the framework of the fragment. The role of each return value within the application is explained later.
Generally, the caller of a dialog receives values entered in the dialog and performs some processing with the values. Let us see how to provide this flow by using a request code and the onActivityResult() method.
A skeleton created for a new fragment in Android Studio returns input in a different way. Such a skeleton returns input via the OnFragmentInteractionListener interface because it is assumed that the fragment parent is an activity. The method using a request code and the onActivityResult() method is valid when the parent is a fragment.
The figure below shows the flow of calling the add dialog and getting return values from the dialog.
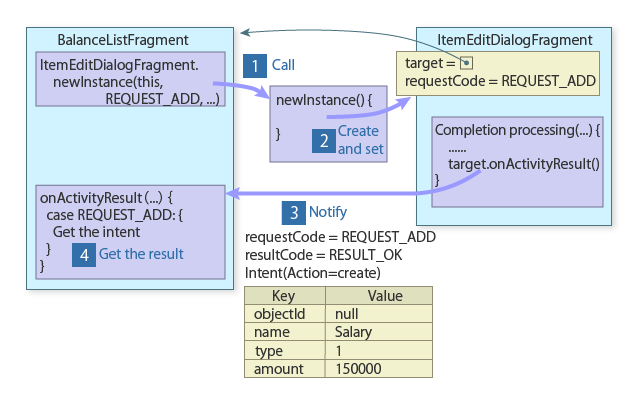
- Call the factory method of the dialog. When the method is called, specify the fragment that will receive the result (the calling fragment
this) and a request code (REQUEST_ADD). The request code will be used in to identify the displayed dialog. - Create a fragment instance with the factory method
newInstance(). When an instance is created, set the receiving fragment and the request code passed in to the dialog.
 - After the input is completed in the dialog, return the result to the receiving fragment. To do so, specify the request code (
REQUEST_ADD), a result code (RESULT_OK), and anIntentinstance that stores return values from the dialog as arguments of theonActivityResult()method. - Get the result with the
onActivityResult()method of the receiving fragment according to the request code.
The sample code below implements this processing.
We have seen this code in the BalanceListFragment class earlier; it calls the add dialog and corresponds to ![]() in the figure.
in the figure.
public class BalanceListFragment extends ListFragment {
  private static final int REQUEST_ADD = 1000;
  private static final int REQUEST_EDIT = 1001;

  @OnClick(R.id.button_add)
  void addClicked() {
    // Show the add dialog.
    ItemEditDialogFragment dialog = ItemEditDialogFragment.newInstance(this, REQUEST_ADD, null, "", Field.Type.INCOME, 0);
    dialog.show(getFragmentManager(), "");
  }
}
The first argument of the newInstance() method, this means that this class will receive the input from the dialog. The second argument, REQUEST_ADD is the request code to be used when the input is received. REQUEST_ADD is specified here because the ItemEditDialogFragment class is used to add an entry. It is used in the addClicked() handler of the "+" button in the data listing screen. When an entry is edited, the same dialog is used with the request code REQUEST_EDIT. You can distinguish the purpose of the dialog by checking the request code when the result is received in ![]() .
.
Assign a numeric value to each of the request codes in the constant declaration section at the beginning of the class. Any value can be assigned as far as it is unique within the BalanceListFragment class.
The third and subsequent arguments are values to pass to the dialog. See Instantiating a fragment.
The called ItemEditDialogFragment class performs the following processing.
public class ItemEditDialogFragment extends DialogFragment {
  static final String RESULT_OBJECT_ID = "objectId";
  static final String RESULT_NAME = "name";
  static final String RESULT_TYPE = "type";
  static final String RESULT_AMOUNT = "amount";

  public static ItemEditDialogFragment newInstance(Fragment target, int requestCode,
          String objectId, String name, int type, int amount) {
    ItemEditDialogFragment fragment = new ItemEditDialogFragment();
    fragment.setTargetFragment(target, requestCode);
    ......
    return fragment;
  }

  private void submit(String action) {
    Fragment target = getTargetFragment();
    if (target == null) { return; }

    String name = mNameEdit.getText().toString();
    int type = toType(mRadioGroup.getCheckedRadioButtonId());
    int amount = toInt(mAmountEdit.getText().toString());
    int subAmount = toInt(mSubAmountEdit.getText().toString());

    Intent data = new Intent(action);
    data.putExtra(RESULT_OBJECT_ID, mObjectId);
    data.putExtra(RESULT_NAME, name);
    data.putExtra(RESULT_TYPE, type);
    data.putExtra(RESULT_AMOUNT, amount * 100 + subAmount);

    target.onActivityResult(getTargetRequestCode(), Activity.RESULT_OK, data);
  }
}
The newInstance() method and the setTargetFragment() method correspond to ![]() in the figure.
in the figure.
The newInstance() method performs the tasks explained in Instantiating a fragment. Then, the setTargetFragment() method sets the fragment that receives return values and the request code in the dialog. The setTargetFragment() method is one of the fragment features provided by the Fragment class.
Kii Balance returns the result from the dialog with the submit() method after the processing is completed in the dialog. This processing corresponds to ![]() .
.
The submit() method processes the following tasks.
Get the target instance of the
onActivityResult()method with thegetTargetFragment()method. The target fragment is the one set with thesetTargetFragment()method within the factory method.Get the input from the user interface and store the edited data in the
Intentinstance. Theactionfield of theIntentinstance holds one of the strings:create,update, ordeleteaccording to the tapped button.Get the request code set with the factory method by using the
getTargetRequestCode()method.Set the result code to
RESULT_OK. This code means the processing result in the dialog is returned.
Finally, the BalanceListFragment class receives the result. See the implementation of the onActivityResult() method below. This processing corresponds to ![]() .
.
public class BalanceListFragment extends ListFragment {
  @Override
  public void onActivityResult(int requestCode, int resultCode, Intent data) {
    if (resultCode != Activity.RESULT_OK) { return; }

    switch (requestCode) {
    case REQUEST_ADD: {
      String name = data.getStringExtra(ItemEditDialogFragment.RESULT_NAME);
      int type = data.getIntExtra(ItemEditDialogFragment.RESULT_TYPE, Field.Type.EXPENSE);
      int amount = data.getIntExtra(ItemEditDialogFragment.RESULT_AMOUNT, 0);

      createObject(name, type, amount);
      break;
    }
    case REQUEST_EDIT: {
      ......
    }
    }
    super.onActivityResult(requestCode, resultCode, data);
  }
}
The above sample code takes values from the dialog as arguments and processes the data for the mobile app.
In the onActivityResult() method, the action performed in the dialog is categorized with the request code and the input in the dialog is obtained from the Intent instance. You can apply this flow to your actual mobile apps.
What's Next?
This is the end of the section of the implemented techniques. Let us review Kii Balance that is implemented with these techniques.
Go to Implementing an Activity.