Data Browser
Data Browser is a tool to browse your application data on the developer portal. It allows you to browse and edit data in buckets.
Opening the data browser
You can open the data browser with the following steps:
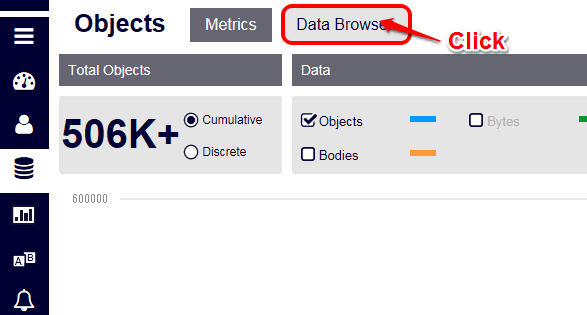
- Select the application on the developer portal.
- Click the "DATA BROWSER" icon.
This will bring up the initial screen like below.
Managing buckets
The following features are available in the data browser:
- Browsing an existing bucket
- Adding a new bucket
- Deleting an existing bucket
- Changing an existing bucket's ACL
Adding a new bucket
Use the UI at the top to add a new bucket.
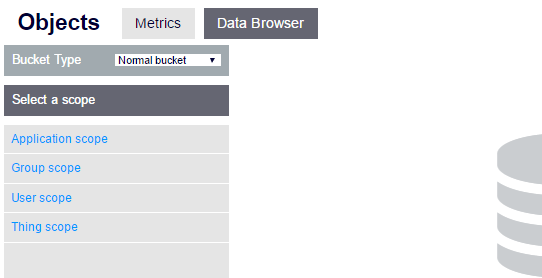
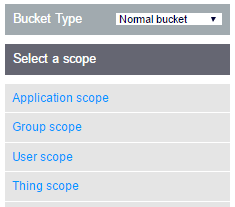
- Select "Normal" for the bucket type.
Select the bucket scope ("Application", "User", "Group", or "Thing").
For some bucket scopes, you will enter more information using drop-down menus.- If you are selecting a user-scope, select the target user. You can select how you want to specify the target user.
- If you are selecting a group-scope, select the target group.
- If you are selecting a thing-scope, select the target thing. You can select how you want to specify the target thing.
Now, Enter the bucket name and click "+ Create new bucket" button.

If you cannot find the button, press the "Expand" button.
Browsing an existing bucket
Use the UI at the top to browse an existing bucket.
- Select "Normal" for the bucket type.
Select the bucket scope ("Application", "User", "Group", or "Thing").
For some bucket scopes, you will enter more information using drop-down menus.- If you are selecting a user-scope, select the target user. You can select how you want to specify the target user.
- If you are selecting a group-scope, select the target group.
- If you are selecting a thing-scope, select the target thing. You can select how you want to specify the target thing.
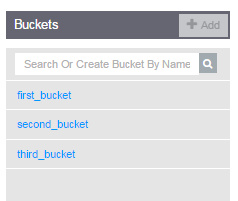
Now, select a bucket name to browse in a pull-down menu like below
You will see a list of all objects in the bucket like below.
To browse and edit an object, simply click it in the list. See Managing objects for more information.
If the application data is not shown properly, check if you are querying the correct scope (See here for more discussion).
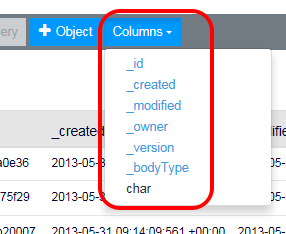
Customizing the keys to show
By default, the list only shows the predefined keys like "_id" and "_created" (See here for the details on these predefined keys). You can customize the keys to show by clicking the "Columns" button and by toggling key names.
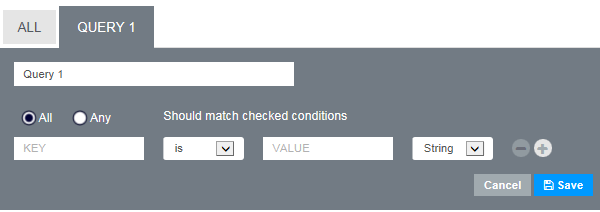
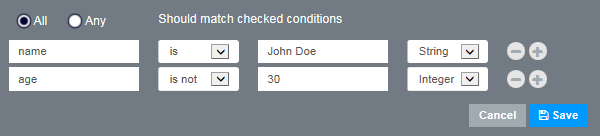
Filtering the object list
By default, all objects in a bucket will be listed.
You can filter the list by setting your custom query in the field.

Clicking "help?" will show you some examples of how you can define your query.
Deleting an existing bucket
To delete a bucket, open the target bucket first by following the procedure in Browsing an existing bucket.
Then, click the gear icon at the upper-right corner of the object list screen and select "Delete Bucket".
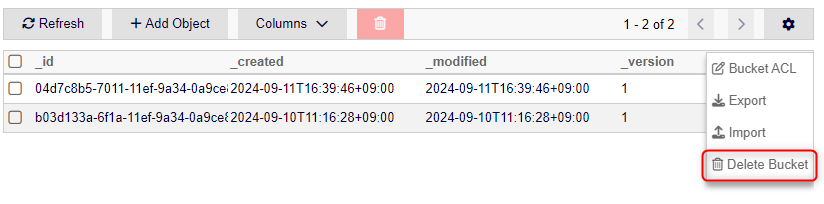
The confirmation dialog will show up. Select "OK" to delete the bucket.
Once the bucket is deleted, all objects in the bucket will be also deleted.
Changing an existing bucket's ACL
To change the ACL of the bucket, open the target bucket first by following the procedure in Browsing an existing bucket.
Then, click the gear icon at the upper-right corner of the object list screen and select "Bucket ACL".
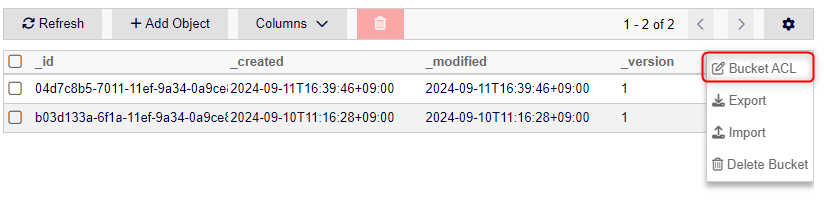
This will bring you to the "Bucket ACL Settings" screen.

To check or update ACL entries, follow the steps below.
Select the "Action".

For the details of each action, see "Bucket Access Control" (Android, iOS, JavaScript, REST).
Selecting the action will bring up the current ACL settings on the action.
Click the toggle buttons to change the permission granted to "Anonymous User" and "Any Authenticated User".
See "Subject" (Android, iOS, JavaScript, REST) for the details of "Anonymous User" and "Any Authenticated User".
To add a new ACL entry, specify the target by selecting the target type (User ID, Group ID, or Thing ID) and by typing their ID.
Pressing the "+Grant" button will create the new ACL entry and grant permission to the specified target.
To revoke an existing ACL entry, select the target ACL entry and press the "-Revoke" button.

Note that some ACL entries cannot be revoked. See "Cannot delete default ACL entries of scope owners and creators" (Android, iOS, JavaScript, REST) for more information.
Managing Objects
The following features are available in the data browser:
Adding and updating an object
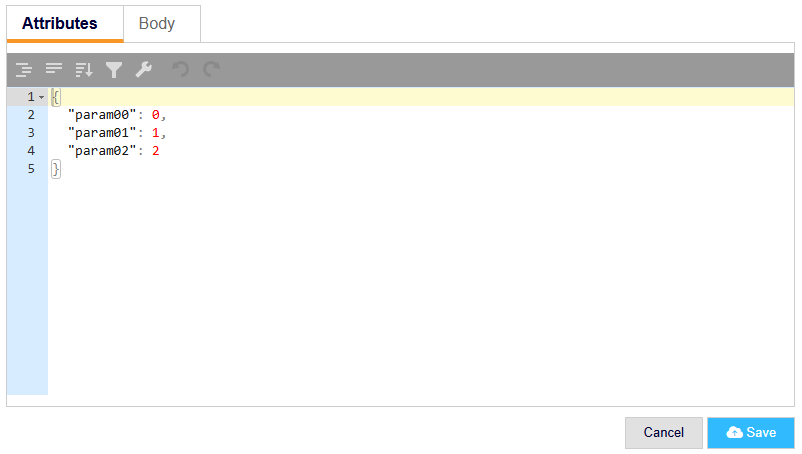
To add a new object, open the target bucket and click the "+ Add Object" button.

This will bring up the empty object editor.

- Enter the JSON document to define the object.
- You can optionally set its ID. If you don't set the ID, the ID will be assigned automatically.
- When you are done with editing, press the "Save" button
To open an existing object, click the target object in the list. This will bring up the object editor with the current key-value pairs in the object.
- If you want to update the object, edit the JSON document.
- When you are done with editing, press the "Save" button.
Deleting an object
You can delete objects by toggling the target objects and by pressing the "Delete" button.

Managing object bodies
Clicking the "Body" tab will show the object body console.

Uploading an object body
To upload an object body, select the target file and click the "Upload" button in the "Upload Object Body" section.
Downloading an object body
To download an object body, click the "Download Object Body" button. The button is only available when you are opening an object with an object body.
Deleting an object body
To delete an object body, click the "Delete Object Body" button. The button is only available when you are opening an object with an object body.
Publishing an object body
To publish an object body, click the "Generate URL" button. The button is only available when you are opening an object with an object body.
- When the object body is published, the URL for accessing it will be displayed.
- You can optionally set an expiration time using either of the following methods:
- The time when the URL will be expired such as March 31, 2099.
- The lifetime of the URL such as one hour from now.
The data browser does not preserve the URL. When you refresh the browser, for example, you have no way to check the URL again (the URL itself is still valid, and you can access the object body with the URL).
Importing and exporting data
The following features are available in the data browser:
Importing data
To import data, select the target bucket. Then, click the gear icon and select "Import".

Select the import file and press the "Import" button. The import starts.
You can select the following options when importing data:
- Treat all fields as String: When enabled, all values are treated as String.
- Bucket recreation: When enabled, all existing data in the bucket are erased before importing the data.
- Create / Update objects with _id: When enabled, objects will be created/updated with the specified ID.
- Export failed data as CSV if any: When enabled, a CSV file containing all data that failed to be imported will be created.
Format of the import file
The import file must be in the CSV or TSV format. It will be treated as UTF-8 encoded data.
The data browser reads the data as follows:
The first line is treated as the header.
- The values in the line are treated as keys for the key-value pairs in objects.
- If you set the option "Create / Update objects with _id", add "_id" in the first line as well (Note: any fields starting with "_" other than "_id" will be ignored).
The second and subsequent lines are treated as values for the key-value pairs in objects.
- Each line corresponds to one object; the values in a line are treated as values for the key-value pairs in an object.
- The values are parsed as JSON data by default unless the option "Treat all fields as String" is enabled.
- If you set the option "Create / Update objects with _id", set the object ID as well. A new object will be created if no object with the specified ID exists; otherwise, the existing object will be overwritten with the specified values.
Example #1
Suppose that the import file contains the following data:
name,surname,size
John,Doe,999
Jane,Doe,888
This file will create the following two objects in the target bucket:
[
  {
    "name": "John",
    "surname": "Doe",
    "size": 999
  },
  {
    "name": "Jane",
    "surname": "Doe",
    "size": 888
  }
]
Example #2
Here is more complex example:
hello,cruel,world
"{ ""someobj"" : [ 1, 2, 3, null ] }",123,
true,false,null
"""true""","""false""","""null"""
This will create the following objects:
[
  {
    "hello": {
      "someobj": [
        1,
        2,
        3,
        null
      ]
    },
    "cruel": 123,
    "world": ""
  },
  {
    "hello": true,
    "cruel": false,
    "world": null
  },
  {
    "hello": "true",
    "cruel": "false",
    "world": "null"
  }
]
Exporting data
You can export data as a CSV file. All objects in the target bucket that match with the active query will be exported.
To export data, select the target bucket. Then, click the gear icon and select "Export".
You will be prompted to select where to save the CSV file.
The file is UTF-8 encoded. Its filename will be "{Bucket Name}.csv".
Format of the export file
The export file will be in the following format (basically the format is the same as that of the import file):
The first line will be the header that contains all the keys.
- Custom keys are listed in alphabetical order.
- Predefined keys set by Kii Cloud (e.g.,
_createdand_id) are listed after the custom keys.
The values for each object are dumped in the second and subsequent lines. Each line represents one object.
- A string value will be quoted.
- A JSON value will be flattened.
Example #1
For example, suppose that you export the following two objects:
{
    "name": "Michael",
    "surname": "Jackson",
    "size": 999
},
{
    "name": "Johnny",
    "surname": "Depp",
    "size": 888,
    "pirates": true
}
The exported file will be like this:
name,pirates,size,surname,_created,_id,_modified,_owner,_version
"""Johnny""",true,888,"""Depp""",1440058127729,"""af18ce10-4712-11e5-87ed-123143052eaa""",1440058127729,"""bb2f192b159c0743a97b066cfd190ba2""","""1"""
"""Michael""",,999,"""Jackson""",1440058111051,"""a527f1b0-4712-11e5-87ed-123143052eaa""",1440058111051,"""bb2f192b159c0743a97b066cfd190ba2""","""1"""
Example #2
Here is another example:
{
  "hello": {
    "someobj": [
      1,
      2,
      3,
      null
    ]
  },
  "cruel": 123,
  "world": ""
},
{
  "hello": true,
  "cruel": false,
  "world": null
},
{
  "hello": "true",
  "cruel": "false",
  "world": "null"
}
The exported file will be like this:
cruel,hello,world,_created,_id,_modified,_owner,_version
123,"{""someobj"":[1,2,3,null]}","""""",1440057447395,"""c63da810-470b-11e5-87ed-123143052eaa""",1440057447395,"""bb2f192b159c0743a97b066cfd190ba2""","""1"""
false,true,null,1440057447135,"""f02902a0-470b-11e5-87ed-123143052eaa""",1440057447135,"""bb2f192b159c0743a97b066cfd190ba2""","""1"""
"""false""","""true""","""null""",1440057446835,"""f97c8d90-470b-11e5-a7dc-123143051a24""",1440057471951,"""bb2f192b159c0743a97b066cfd190ba2""","""2"""